Are you a small or medium-sized business looking to track your income and expenses in Google Sheets? Chances are, your cash flow involves different currencies, while your tax report needs to be submitted in your local currency. This means you need to take into account exchange rates when calculating income and expenses. Regular users often resort to Googling “currency converter” to get this task done.
But wouldn’t it be great to automate this process and integrate the conversion function right into your spreadsheet? Well, read on to discover how you can achieve that!
Track Exchange Rates in Google Sheets with the Native Function – GOOGLEFINANCE
GOOGLEFINANCE is the Google Sheets function that enables you to import real-time data about financial markets. The function retrieves this data from Google Finance, a web service that provides information about local and global market trends, including daily stock prices, exchange rates, and more. Check out our advanced tutorial on GOOGLEFINANCE to learn more.
For our exchange rate tracking, we can use a simple GOOGLEFINANCE formula syntax without any optional parameters:
=GOOGLEFINANCE("ticker-symbol")
- The
ticker-symbol, in our case, is an abbreviation for representing currency pairs, for example, EURUSD, USDCAD, etc.
Please note that EURUSD displays the exchange rate of the Euro against the US Dollar. If you need the exchange rate of the US Dollar against the Euro, use the inverse symbol – USDEUR.
Tracking Exchange Rates with GOOGLEFINANCE
Now let’s put the function into practice. We will track the exchange rate of the following currencies against the US Dollar:
- EUR (Euro)
- AUD (Australian Dollar)
- CAD (Canadian Dollar)
- GBP (British Pound)
- IDR (Indonesian Rupiah)
- INR (Indian Rupee)
- PHP (Philippine Peso)
- BRL (Brazilian Real)
- PLN (Polish Złoty)
- JPY (Japanese Yen)
- CNY (Chinese Yuan Renminbi)
To harness the power of the GOOGLEFINANCE function, we need to have a ticker-symbol comprised of two currency codes – our base currency and USD. The CONCAT function nested with ARRAYFORMULA will help us handle this:
=arrayformula(if(len(B2:B)=0,,concat(B2:B,"USD")))
Even better, we can eliminate the Ticker column and simply insert the CONCAT formula into the GOOGLEFINANCE formula like this:
=GOOGLEFINANCE(concat("USD",B2:B))
It might seem like we could just combine ARRAYFORMULA and this GOOGLEFINANCE formula to extend the results. However, GOOGLEFINANCE as an argument for ARRAYFORMULA doesn’t work 🙁 So, you’ll need to either manually drag the formula down or use the Google Sheets shortcut Ctrl+Enter.
This is not convenient, as every time you add a new row anywhere and fill it with a new ticker, you’ll have to manually copy and paste the GOOGLEFINANCE formula.
Let’s tweak our GOOGLEFINANCE formula to get the exchange rate against the US Dollar. You need to reverse “USD” and B2:B in the CONCAT formula part, then drag the formula down again:
=GOOGLEFINANCE(concat(B2:B,"USD"))
And there you have it! The exchange rates will be updated in case of any changes, but you can refresh them every minute. Go to File => Spreadsheet settings => Calculation and choose “On change and every minute”. Save the settings to enable the one-minute update.
You can copy this exchange rate tracking template into your spreadsheet and customize it to suit your needs.
GOOGLEFINANCE Error #N/A
Although GOOGLEFINANCE is a native Google Sheets function, we can’t claim it to be very reliable. On StackOverflow and the Google community, you can find recent comments indicating that GOOGLEFINANCE formulas are no longer working. The #N/A error message usually returns something like this:
“When evaluating Google Finance, the query for symbol ‘****’ returned no data.”
This typically is an internal GOOGLEFINANCE error, so adding IFERROR to your formula or modifying the refresh interval won’t solve the issue. So, what’s the solution?
While GOOGLEFINANCE is great when you use a limited number of ticker symbols (let’s say less than 25), for reliably importing larger sets of stock data, you need to use an API service.
How to Import Currency Exchange Data into Google Sheets from Financial Services via APIs
Typically, developers use APIs to integrate certain functionalities, such as exchange rates, into their applications. We will explain how you can use APIs to import currency data into Google Sheets without coding.
Financial services usually utilize the JSON format to transfer data via APIs. We will use the JSON importer to retrieve and convert JSON data into Google Sheets. This is a supported source by Coupler.io, a product that allows importing data into Google Sheets, Excel, BigQuery, and Looker Studio from various sources.
The instructions provided in this article are sufficient to create an automated integration. However, please note that we are not responsible for the outcome if you use the instructions incorrectly, specify incorrect parameters, or if there are changes in the application’s API. If you need help with the setup or want a more user-friendly version of this connector, we can develop this premium integration for you for free. Just select the application you need from the list and follow the instructions to request the automated integration.
To set up an importer, sign up for Coupler.io, click on “Add a New Importer,” and enter the name of your importer in the “Title” field. Then, you will need to complete the three steps: source, destination, and scheduling.
Source
-
Choose JSON as the source application from the list.
-
Insert the JSON URL to import the data into the “JSON URL” field. You can find the URL in the API documentation of the financial service you’re using. For example:
https://xecdapi.xe.com/v1/currencies.json/?iso=USD,EUR,CAD
Click “Continue” to reveal advanced settings and expand optional fields:
-
Click “Continue” to expand optional fields where you can specify additional parameters, such as HTTP method, request headers, URL query string, etc. In most cases, you will need information about request headers and query options, which you can find in the API documentation of the financial service you’re using. For example, here’s what an authorization header might look like:
Authorization: Basic enJlY29yZHM0OTEamFiZjk2MWZtNnA4ZjY=
Destination
- Select a file on your Google Drive to transfer the data. Choose an existing sheet or enter a name to create a new one.
- Optionally, you can:
- Change the first cell where you import your data by specifying your value in the “Cell Address” field. A1 cell is set as default.
- Change the import mode from “replace” to “add”.
- Add a column specifying the date of the last data refresh.
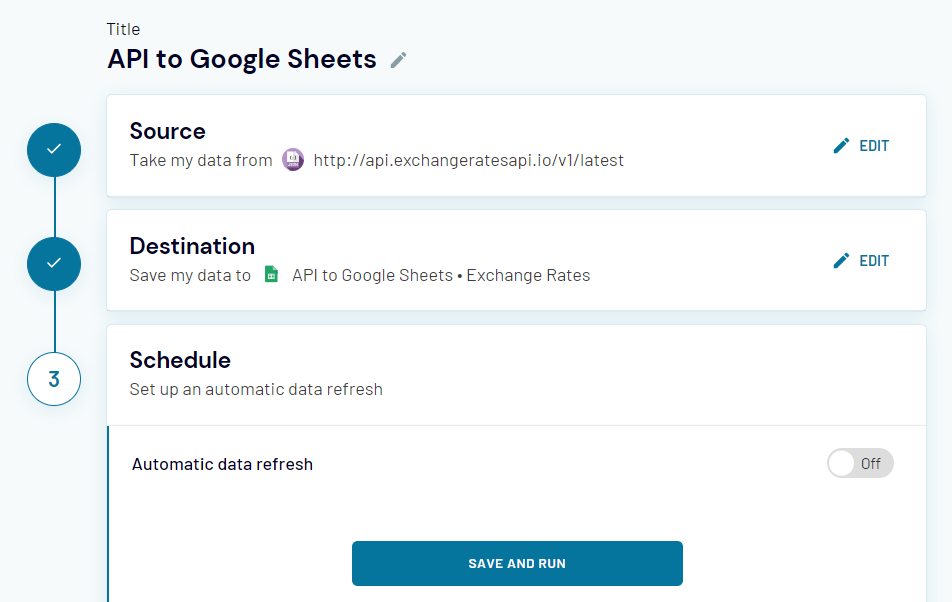
Click “Save & Run” to load your data into Google Sheets on demand. If you want to automate this pipeline, enable automatic data refresh and configure scheduling settings.
Let’s check how it works with a concrete example.
Import Currency Exchange Rate Data into Google Sheets via an API
We reviewed the top 10 currency and forex APIs by Yasu and selected two options to test.
Foreign Exchange Rates API
The Exchange Rates API is a free service to get current and historical foreign exchange rates published by the European Central Bank. They offer a free plan with up to 250 requests per month. Once you sign up, you will get an API access key required to fetch information from the API.
To import data using the JSON importer, you need to specify the JSON URL and the URL query string. For example, let’s load the latest currency exchange rate data:
JSON URL
https://api.exchangeratesapi.io/v1/latestURL query string parameters:
access_key: {your-access-key}Here’s what the configured importer looks like:
Click “Save & Import” and welcome your data into the spreadsheet.
That was easy, but it’s not exactly what we needed. The API retrieved many exchange rates that are quoted against the Euro. Now, let’s request specific exchange rates against the US Dollar. To do that, add the following string to the URL query string parameters:
base: USD
symbols: AUD,BRL,CAD,CNY,EUR,GBP,IDR,INR,JPY,PHP,PLN
Note: You can also attach URL query string parameters to the JSON URL as follows:
https://api.exchangeratesapi.io/latest?base=USD&symbols=AUD,BRL,CAD,CNY,EUR,GBP,IDR,INR,JPY,PHP,PLNIf you enable automatic data refresh, Coupler.io will automatically request the currency exchange rates according to the schedule you specified.
XE Currency Data API
Now let’s see how the JSON client works with a paid solution. We chose the XE Currency Data API as it offers a free trial and endpoints for converting one currency to another. After signing up, you downloaded the technical documentation explaining the API’s endpoints. The main difference between XE and the Exchange Rates API is that all requests to the XE API must be authenticated through HTTP Basic Access Authentication.
This means you will need to enter the authorization header in the “HTTP Headers” field following this format:
Authorization: Basic {credentials}{credentials} is the Base64 encoding of the account ID and API key joined by a single colon “:”. For example, if your XE account ID is example491919043 and your account API key is jabf961f4u6p8k9usfmfu6amf6, you will get the following:
example491919043:jabf961f4u6p8k9usfmfu6amf6Encode this string to Base64 using a dedicated tool or the CONCATENATE formula we introduced in the Google Sheets CONCATENATE blog post:
ZXhhbXBsZTQ5MTkxOTA0MzpqYWJmOTYxZjR1NnA4azl1c2ZtZnU2YW1mNg==Now let’s see the JSON client parameters required to import exchange rate data from XE:
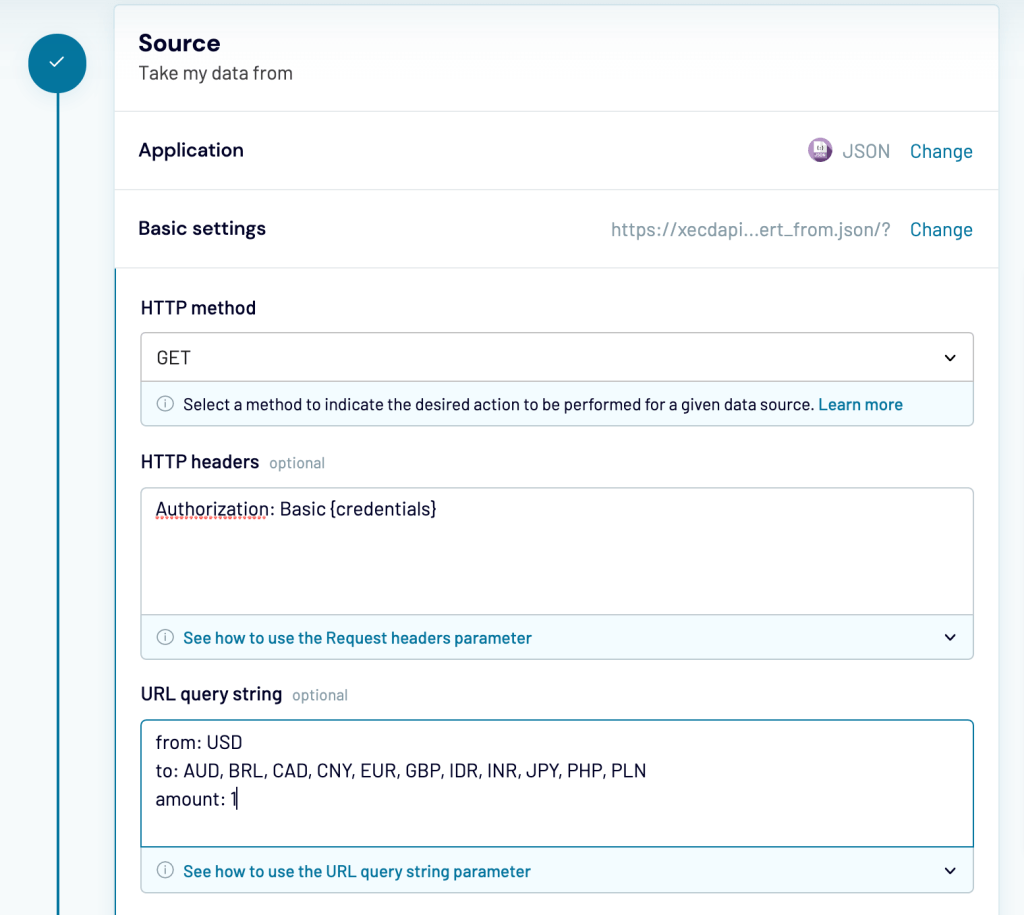
JSON URL
https://xecdapi.xe.com/v1/convert_from.json/?HTTP Method: GET
Request Headers:
Authorization: Basic {credentials}URL query string parameters:
from: USD
to: AUD, BRL, CAD, CNY, EUR, GBP, IDR, INR, JPY, PHP, PLN
amount: 1
Here’s what it looks like:
Here’s the result:

Note: You can also attach URL query string parameters to the JSON URL as follows:
https://xecdapi.xe.com/v1/convert_from.json/?from=USD&to=AUD,BRL,CAD,CNY,EUR,GBP,IDR,INR,JPY,PHP,PLNIf you want to include a column with the inverse rate (a quote where the base and quote currencies are reversed), add inverse: true in the “URL query string parameters”:
from: USD
to: AUD, BRL, CAD, CNY, EUR, GBP, IDR, INR, JPY, PHP, PLN
amount: 1
inverse: true
Here’s what it looks like:

Note: You can also attach URL query string parameters to the JSON URL as follows:
https://xecdapi.xe.com/v1/convert_from.json/?from=USD&to=AUD,BRL,CAD,CNY,EUR,GBP,IDR,INR,JPY,PHP,PLN&amount=1&inverse=trueOnce you have imported the data into your spreadsheet, you can reference it for your calculations using VLOOKUP, QUERY, or FILTER. Check out our dedicated blog post for each of these Google Sheets functions.
Why You Should Use a Custom Currency Exchange Rate Tracker in Google Sheets Instead of a Currency App
The best advantage of Google Sheets is that you can automate a lot of your workflow using different functions or add-ons. This means you spend less time on recurring manual tasks and have more time available for more valuable work. Granted, some currency apps are great, but they can’t be integrated into your spreadsheet. So you’ll either have to manually transfer data from an app to Google Sheets or set up complex integrations. The options presented in this article are time-efficient and easy to implement. Between GOOGLEFINANCE and Coupler.io, the choice is yours. Good luck!


