Do you ever find yourself needing to change the direction of the text in your Google Sheets? Maybe you want to make the text vertical or rotate it at a specific angle. Whatever the case may be, there are several ways to rotate text within a Google spreadsheet, allowing you to select the exact direction or angle that best suits your needs.
Rotating Text Using the Format Menu
To rotate text in Google Sheets, follow these steps:
- Select the cell(s) containing the text you want to rotate.
- Open the text rotation menu by clicking “Format” → “Rotation” or by clicking the “Text Rotation” dropdown in the toolbar.
- Select the desired rotation angle for your text.
It’s as simple as that! Now let’s dive into the detailed steps of rotating text and explore some examples.
How to Rotate Text in Google Sheets
Let’s start by selecting a single cell or a range of cells in your spreadsheet that contains the text you want to rotate. In this example, we’ll select cell A1.
After selecting the cells with the text you want to rotate, open the text rotation menu in one of two ways:
Using the Text Rotation Dropdown in the Toolbar
- Click the dropdown menu in the toolbar that displays the letter “A” in a tilted position.
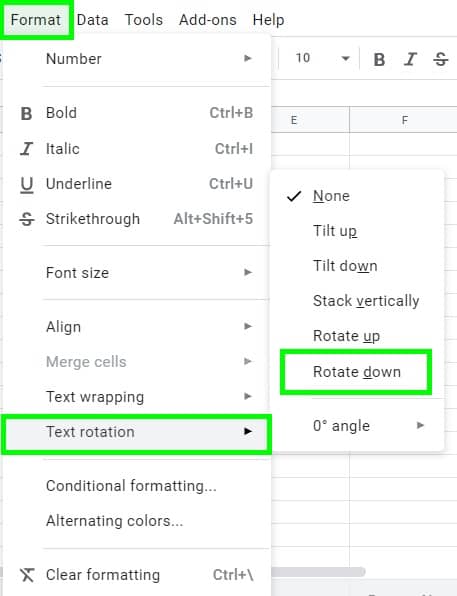
Using the Format Menu
- Click the “Format” menu in the toolbar, then click “Rotation” and select “Text Rotation.”
Now, simply select the direction in which you want to rotate your text. You can even choose to set a custom rotation angle if desired.
In the example above, “Rotate Down” has been selected, and you can see how it has affected our sample text. Notice how the words “Sample Text” have now been rotated downwards, and the line height has automatically adjusted to fit the text.
While there are different ways to rotate text within cells, in the examples below, we will focus on rotating text upwards and downwards, as these are the most commonly used rotation options.
At the end of the article, you’ll find a section that shows how to rotate text using formulas. While it is possible to make text vertical with a formula, it is easier to simply modify the cell format to let Google Sheets handle the rotation for you.
Click here to get your free cheat sheet on Google Sheets.
The Different Ways to Rotate Text
When using the text rotation menu directly available in the toolbar, you can see an example of what each option will look like. However, the image below provides an even better visualization to help you understand how each option will transform your text. You can even choose a custom angle to rotate your text! In the following examples, we will focus on rotating text upwards, downwards, and vertically stacked, as these are the most commonly used rotation options.

How to Make Text Vertical in Google Sheets
Alright, let’s now look at some examples with more data in the spreadsheet. In the examples below, I will show you how to make text vertical in Google Sheets by rotating text upwards and downwards.
To make text vertical in Google Sheets, follow these steps:
- Select the cell(s) containing the text you want to make vertical.
- In the toolbar, click “Format” → “Rotation,” or click the “Text Rotation” dropdown button (with an arrow under the letter “A”).
- Choose the desired vertical rotation style/angle – Tilt Up, Tilt Down, or Stack Vertically.
How to Rotate Text Upwards in Google Sheets
One of the most common uses of text rotation in Google Sheets is when you want your columns to be tightly spaced, but your headers are too large to fit when the columns are narrow.
In this example, we have a data set showing the total sales amount per month for a number of sales representatives.
As you can see in the first image, when the columns are tightly spaced to view the sales for the entire year, the month names in the header are too long to fit properly within the cells.
To address this, we will rotate the text upwards so that the full name of each month can fit within the columns as they are currently spaced. The line height will automatically adjust to fit the text after it has been rotated… but in this example, you can see that row 1 has already been manually extended to perfectly fit the text in cell A1.
Follow these steps to follow the example below and rotate the text upwards, as shown in the images:
- Select the range of cells B1:M1.
- Open the text rotation menu.
- Select “Tilt Up”.
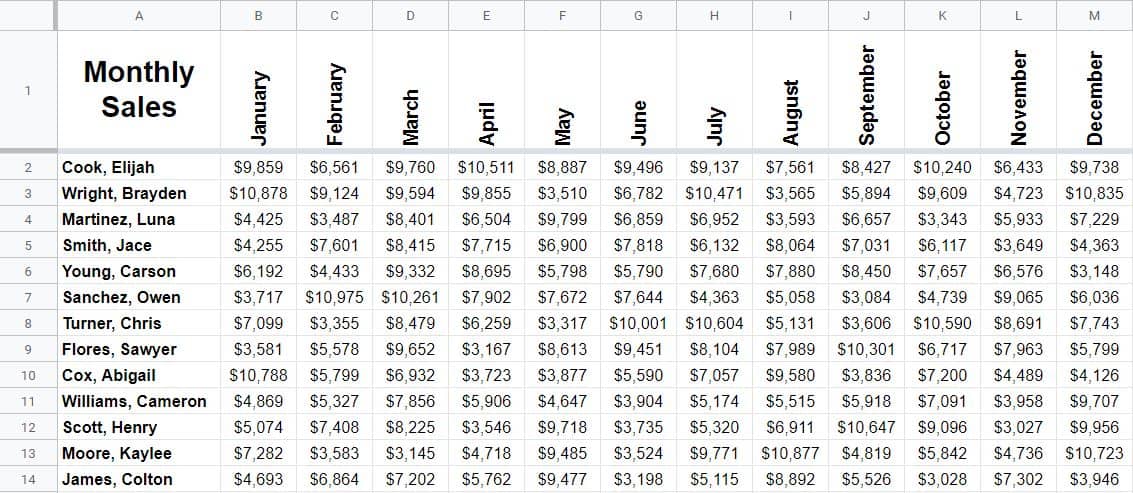
The above image shows how the text appears after being rotated. The name of each month is now fully visible, along with all the sales data.
You will notice in your sheet that the row height of row 1 will automatically adjust to fit the longest/tallest piece of text in that row, which in this case is “September”.
Now let’s take a look at another similar example where the headers need to be made vertical to fit within a narrow column width.
How to Rotate Text Downwards in Google Sheets
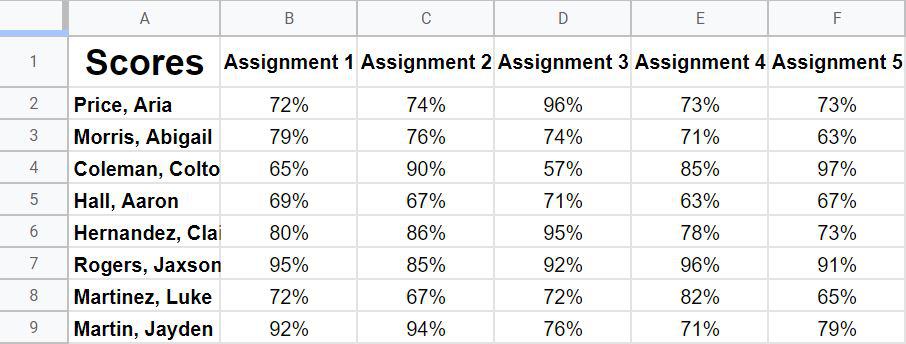
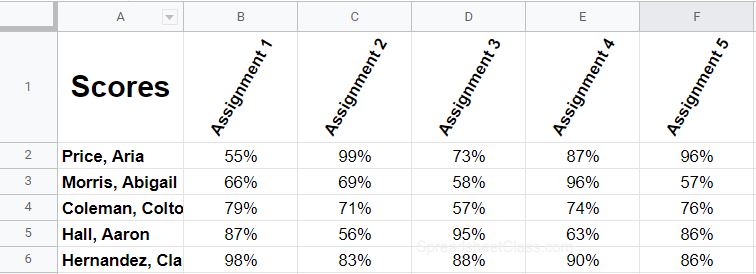
It is very common to use rotated text in grade books, where assignments are listed horizontally at the top of the sheet.
Assignments take up very little horizontal space, so columns can be squeezed tightly together if the assignment names are rotated vertically to fit within the narrow columns.
In this example, you can see that the assignment names are already entered in row 1, but due to long words and narrow columns, the text doesn’t fit.
Not only does this not look good, but assignment numbers cannot be seen, making it impossible to determine which assignment is recorded in each column.
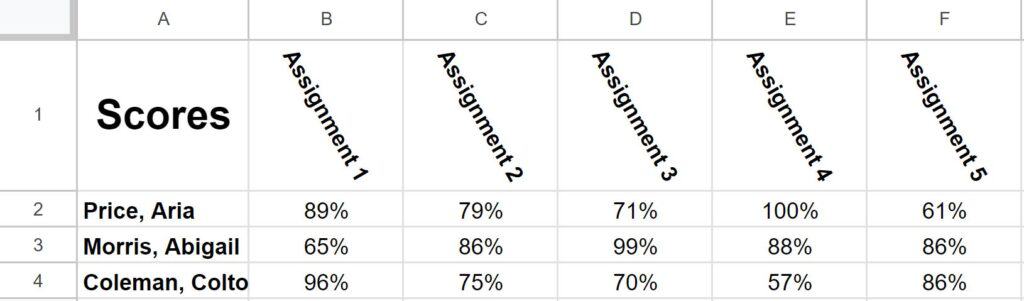
Follow the following steps to follow the example and rotate the text downwards, as shown in the images:
- Select the cells in the range B1:J1.
- Open the text rotation menu.
- Select “Tilt Down”.
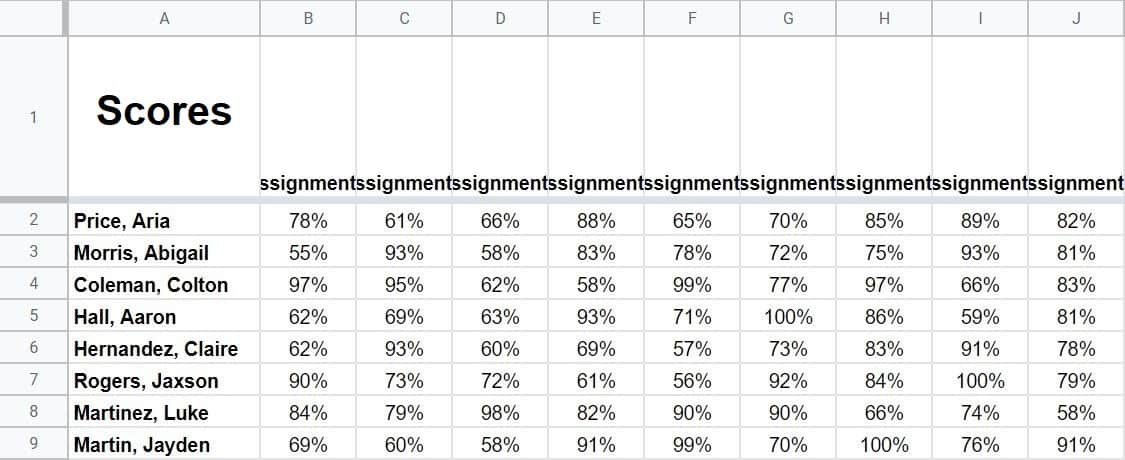
In the image above, you can see that after rotating the assignment names downwards, they fit easily within the cells, allowing both grades and assignment names to be visible.
In the examples in this article, we have seen how to make text vertical. However, there may be situations where you need to orient the text so that it is diagonal. Remember, you can choose any direction or angle that suits your needs.
How to Stack Text Vertically
Another way to make text vertical in Google Sheets is by using the “Stack Vertically” option in the text rotation menu. With this option, the letters remain vertical while the words are rotated to be vertical, meaning the letters are stacked vertically on top of each other. As you can see in the image below, in cells B1 to E1, the text is stacked vertically. This works especially well for month abbreviations.

How to Make Text Vertical Using Formulas
So far, we have seen how to rotate text using cell formatting, but there are also a few formulas that can make text vertical in Google Sheets if you need to use them.
Both of the formulas presented below can either contain the text directly in the formula or use a cell reference to indicate the text to be rotated. I have shown both methods for both formulas.
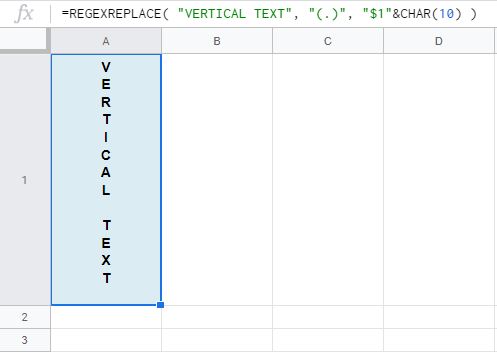
Vertical Text Formula 1
The first formula that can be used to rotate text in Google Sheets utilizes the REGEXREPLACE formula. To learn how to extract text and numbers from text strings with REGEXREPLACE, refer to the article below:
“All the ways to extract text and numbers from a string”
Formula 1: Text entered directly in the formula itself
With this formula, the text to be made vertical is directly entered within the formula.
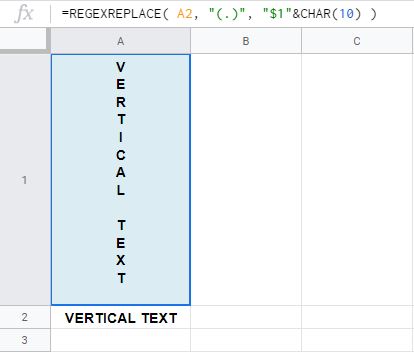
=REGEXREPLACE("VERTICAL TEXT", "(.)", "$1"&CHAR(10))
Formula 1: Text entered in a cell
Here’s another way to use the same formula, where the text to be made vertical is entered into cell A2, and the formula refers to that cell to make the text vertical. The text to be rotated is entered into cell A2, and the formula in cell A1 refers to cell A2. This way, the text from cell A2 appears vertically in cell A1.
=REGEXREPLACE(A2, "(.)", "$1"&CHAR(10))
Vertical Text Formula 2
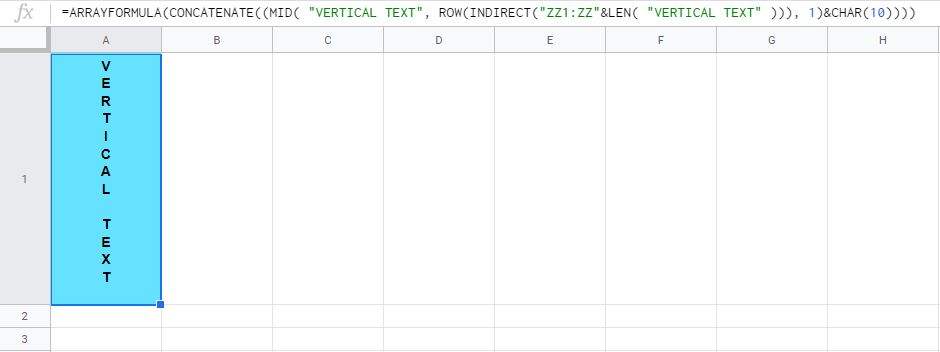
Now let’s look at another formula that can make text vertical in Google Sheets. This formula does the same thing as the previous formula.
Formula 2: Text entered directly in the formula itself
The following formula is the version that has the text to be rotated entered directly within the formula.
=ARRAYFORMULA(CONCATENATE((MID("VERTICAL TEXT", ROW(INDIRECT("ZZ1:ZZ"&LEN("VERTICAL TEXT"))), 1)&CHAR(10))))
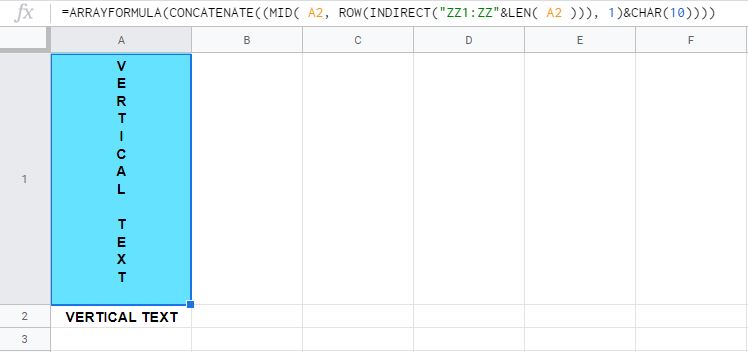
Formula 2: Text entered in a cell
This is the version of the formula that refers to a cell to indicate the text to be rotated.
=ARRAYFORMULA(CONCATENATE((MID(A2, ROW(INDIRECT("ZZ1:ZZ"&LEN(A2))), 1)&CHAR(10))))
How to Make Text Diagonal in Google Sheets
Did you know that you can also rotate text in Google Sheets so that it is diagonal? There are several ways to do this.
To make text diagonal in Google Sheets, follow these steps:
- Select the cell(s) or range of cells you want to rotate/make diagonal.
- Choose “Tilt Up” to rotate the text diagonally upwards. Or choose “Tilt Down” to rotate the text diagonally downwards. Or choose “Custom Angle” to rotate the text at an angle of your choice.
The image below is an example of the text rotation menu with the “Custom Angle” menu open, and as you can see, the menu allows you to select a custom angle for the text rotation. The default is 0 degrees. -90 degrees will rotate the text downwards, and +90 degrees will rotate the text upwards. But you can choose any angle in between these settings, in increments of 15 degrees.
Tilt Up / Tilt Down
To make text diagonal from the predefined options in the text rotation menu, select “Tilt Up” or “Tilt Down”. (Refer to the image at the top of the page for a visual reference)
Tilting the text upwards means that the first letters of the text will be in the bottom left and the last letters of the text will be in the top right.
Tilting the text downwards means that the first letters of the text will be in the top left and the last letters of the text will be in the bottom right.
Custom Text Rotation (Diagonal Text / Headers)
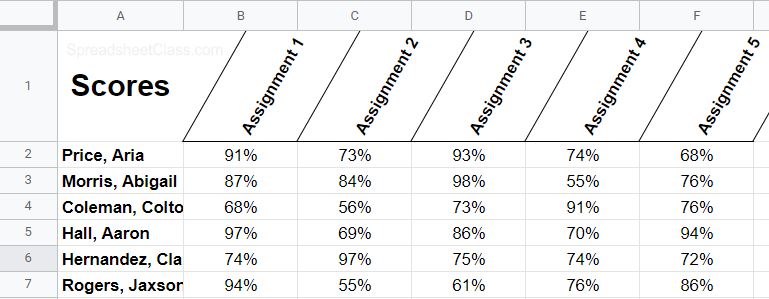
Here’s an example of making the text diagonal in Google Sheets with a custom angle. We will use the same student grade data as a previous example to illustrate this.
As you can see in the image below, the assignment names are listed at the top in horizontal rotation/default position. We want to rotate the headers/assignment names diagonally so that they take up less horizontal space but remain readable.
See below for how to do this.
To make the text diagonal in this example, select cells B1 to F1 (B1:F1), click the “Text Rotation” menu in the toolbar, click “Custom Angle,” and then choose the angle you want to rotate the text (For this example, we will choose 60 degrees).
As you can see in the image below, after rotating the text/headers by 60 degrees, the assignment names are tilted diagonally upwards (at a custom angle). The text takes up less horizontal space, but the diagonal text makes it easier to read the rotated text.
Here’s an example of using a negative custom angle, for example, -60 degrees. As you can see in the image below, when using a negative custom angle, the text rotates downwards (at a custom angle).
Diagonal Borders in Google Sheets
Did you know that you can create diagonal borders in Google Sheets to accompany your diagonal/rotated text? We will continue with the example data from before, after the text has been rotated diagonally.
To create diagonal borders in Google Sheets, follow these steps:
- In the cell where you want the diagonal borders, rotate the text diagonally (from the text rotation menu).
- Apply inner and outer borders to the cells containing the diagonally rotated text. The applied borders will follow the diagonal angle of the text.
In the image below, you can see that after applying borders to the cells containing the diagonally rotated text, the borders are diagonal to match the angle of the text.
Now you know all the different ways to rotate text in Google Sheets!
Quiz: Test Your Knowledge
Answer the following questions about rotating text in Google Sheets to test your knowledge! Scroll to the bottom for the quiz answers.
Question 1: Which of the following custom rotation angles will rotate the text downwards?
- 90 degrees
- -90 degrees
- 0 degrees
Question 2: Among the following options, which ones will make the text diagonal?
- Tilt Up
- Tilt Down
- Stack Vertically
Question 3: True or False: The text rotation options can be found in the “Format” menu and in a dropdown list directly in the toolbar.
- True
- False
Question 4: True or False: With the “Stack Vertically” option, the words are rotated, but the letters remain vertical.
- True
- False
Quiz Answers:
Question 1: 2
Question 2: 3
Question 3: 1
Question 4: 1


