
When using Google Sheets for multiple professional projects, it’s crucial to know who has access to your files. Sharing your information only with the right people ensures peace of mind, as they will handle it with care.
However, if you have shared your document with too many people and are unsure what to do next, worry not! This article will show you how to see who has access to your files and how to manage their permissions.
Who can access your spreadsheets?
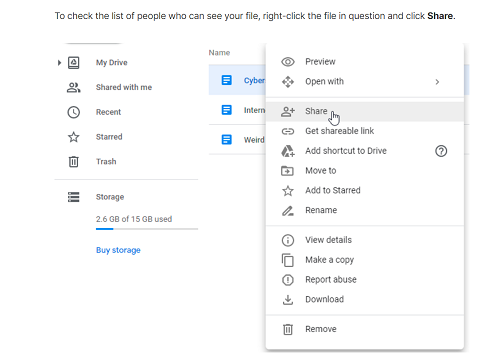
For every file you’ve shared, there is a list of contacts who have access to it. When you right-click on the file and press “Share,” you’ll see all the people you’ve shared it with. If you haven’t shared it yet, your name will be the only one on the list.
Sharing files
One of the advantages of using Drive is its ability to share a large amount of data with just a few clicks. You can share all your files in two ways: using a link or allowing others to access your files.
The sharing process is so simple that all you have to do is click the green “Share” button at the top right of each Google Sheets file. If you want to send a shareable link, simply click on “Get shareable link” and paste it in an email, document, message, or any other communication channel.
Finding shared files with you
Sharing files has never been easier, but if you receive many, make sure to organize them properly. When you open the “Shared with me” section, you’ll see the files and folders shared with you, as well as the files you’ve accessed through a link. Each file contains all the necessary information, such as the owner’s name, sharing date, and document type.
Google even lets you create a shortcut if you want these files to be immediately accessible when you open Google Drive. Here’s how to create a shortcut:
- Open your Google Drive.
- Open the “Shared with me” section and select all the files and folders you want to access via a shortcut.
- Right-click and choose “Add shortcut to Drive.”
- Choose the location and click “Add Shortcut.”
How to stop sharing files
You have probably been in a situation where you shared a file with too many people, whether they are part of your team or not. If you notice unusual activities or changes, it might be time to stop sharing those files. Follow these steps:
- Open Google Sheets and select a folder or file.
- Click on the “Share” option and find the people you no longer want to see on the list.
- Right-click on a person’s name and click “Remove.”
- Repeat this step for each contact until you are only sharing your file with the right people.
- Click “Save,” and all these changes will be applied.
Limited file sharing options
Whenever you share files, you assume that no one will share or print them without your permission. Unfortunately, you often realize this only when the files are already in the wrong hands. Google Sheets allows you to limit who can see your files and what they can do with them.
Those who want to protect their files and folders on Google Drive should follow these steps:
- Find the folders or files you want to protect.
- Open “Settings” at the top of the screen.
- Remove your authorization from people who can comment and view documents without your consent, copy them, download them, or print them.
- Click “Save” and “Done.”
Files with limited duration
If you work with sensitive data or conduct research, file security is paramount. That’s why you can only share a Google Sheets document for a limited time. This way, you give someone a day, a week, or a month to view your files, but access is revoked once the time is up.
Now, let’s see how to do it:
- Open your spreadsheet and click “Share.”
- Select the user(s) who will have temporary access to your documents.
- Click the arrow and select “Grant temporary access.”
- Choose for how many days, weeks, or months, and write it next to “Access expires.”
- Click “Save.”
Transferring file ownership
Google allows you to change the ownership of any file or folder you create. Once the process is complete, you can no longer transfer it back to yourself or permanently delete the file. Before doing this, make sure you understand what will happen and agree to it.
Once you have opened the file and shared it with the right person, go to the list of contacts you shared it with and choose “Make owner.”
Safety first
The quickest way to share documents today is by using Google Drive. However, more than ever, we need to be cautious when sharing our work. Now that we have shown you how to see who has access to your files and how to quickly revoke that access, you can keep all your data secure. Additionally, you now know more about how to share your files for a limited time and how to transfer file ownership.
Do you prefer sharing files via links or by adding other members? Do you feel comfortable sharing files outside of your team?
Let us know in the comments below.


