Last Updated: September 5, 2023
Interesting facts about working with time zones
- By default, Google Sheets uses the time zone set for your computer. So any date or time data you enter into Google Sheets would be considered as in the time zone set for your computer.
- You can find out what time zone your Google Sheets is using.
- You can change the date format and time zone in Google Sheets.
- You can change the date format and time zone across all Google Sheets.
- Supermetrics uses the time zone set in your data platform.
- Looker Studio uses the time zone set in your data platform.
- All time zones are calculated based on GMT / UTC.
How to find out what time zone Google Sheets is using
You can find out what time zone your Google Sheets uses via the ‘now()’ function.
This function returns the current date and time:
Here the time is displayed in the GMT time zone because that’s the time zone set for my computer:
Here the date is formatted as dd/mm/yyyy because the location for my computer is set to ‘United Kingdom’.
Google Sheets picks up location from your computer settings:
Changing the date format and time zone in Google Sheets
If you want to change the way a date is displayed in your Google Spreadsheet, maybe you want the date to display in American date format (where the month comes first, followed by day and year), then click on the ‘Spreadsheet Settings‘ under the ‘File‘ menu:
And then change the location by selecting ‘United States’ from the ‘Locale‘ drop-down menu:
Now the current date and time in the spreadsheet would like the one below:
The date is now displayed in American format (where the month comes first, followed by day and year).
However, the time is still displayed in the GMT time zone.
To change the time zone to say EST, click on the ‘Spreadsheet Settings’ again (under the ‘File‘ menu) and then select ‘(GMT-05:00) Eastern Time’ from the ‘Time zone’ drop-down menu:
Now the current date and time in the spreadsheet would like the one below:
The date is still in the American date format, but now the time is displayed in the EST time zone.
Changing the date format and time zone across all Google Sheets
When you use the ‘Spreadsheet Settings’ (under the ‘File’ menu) to change the date format and time zone, it works only on the individual sheet. These changes won’t work across all Google Sheets.
So if later you create a new Google Sheet, then the date will display according to the location set for your computer, and time will be displayed in the time zone set for your computer.
If you want to change the date format and time zone settings across all Google Sheets, then you need to change your computer’s location and time zone settings.
Changing the time zone used by Supermetrics
Supermetrics uses the time zone set in your data platform
So if you are pulling data from Google Analytics via the Supermetrics Google Sheets Add-on or scheduling data refreshes, then Supermetrics will use the time zone set for the reporting GA4 property.
If you want to change the time zone used by Supermetrics, then you would need to change the time zone settings for the reporting GA4 property:
Similarly, if you are pulling data from any other data platform, say Google Ads, via the Supermetrics Google Sheets add-on or scheduling data refreshes. Supermetrics will use the time zone set for your Google Ads account.
You must ensure you pull data from data platforms that all use the same time zone.
That means the same time zone settings for Google Analytics, Google Ads, Facebook ads, Google Sheets, etc.
Otherwise, you may see a lot of discrepancies when charting data for the current day or the previous day in Looker Studio.
Changing the time zone used by Looker Studio
Note: Google Data Studio is now known as Looker Studio.
Looker Studio uses the time zone set in your data platform
So if you pull data directly from Google Analytics into Looker Studio, then Looker Studio will use the time zone set for the reporting view in GA.
So if you want to change the time zone used by Looker Studio, you need to change the time zone settings for the GA reporting view.
If you pull data from Google Sheets into Looker Studio, then Looker Studio will use the time zone set for the Google Spreadsheet.
Similarly, if you pull data from any other data platform (like Google Ads) into Looker Studio, then Looker Studio will use the time zone set for your Google Ads account.
There is currently no option to change the time zone for reports from within Looker Studio.
How time zones are calculated worldwide
Since a British inventor invented the time zone, all time zones are calculated based on GMT (Greenwich Mean Time), which you can say is like London’s local time (as Greenwich is a district in London, UK).
Your local time zone is either ahead or behind GMT.
For example, EST (Eastern Standard Time) is 5 hours behind GMT. That’s why EST is represented as ‘GMT – 05:00‘.
Similarly, PST (Pacific Standard Time) is 8 hours behind GMT. That’s why PST is represented as ‘GMT – 08:00‘.
UTC (Universal Coordinated Time) is not a time zone but a time standard. But for all intent and purposes, it is just another name for GMT.
There is no time difference between UTC and GMT. For example, EST can be represented as ‘GMT – 05:00’ or ‘UTC – 05:00’.
That means if you live in the UK and your clients are also from the UK, then during the winter months (when the time zone is GMT), you don’t need to worry about time zone differences in Looker Studio.
Avoid charting data for the current day in Looker Studio
By default, Looker Studio uses UTC standard time.
If your data source doesn’t use UTC, you may see discrepancies when charting data for the current day (due to differences between UTC and your time zone).
Such discrepancies increase significantly the further you live from London (like in Australia, New Zealand, etc.), where the time difference between UTC and your time zone is pretty big.
So if you live in Australia and you pull the data for the current day (from the data source which uses a different time zone, say ‘EST’) in Looker Studio, it may not show you any data for ‘today’.
Moreover, I don’t see any real benefit in analyzing an incomplete data set.
So, avoid charting data for the current day in Looker Studio.
How to convert your time zone into UTC in Google Sheets
Google Sheets does not provide any function out of the box to convert a time zone into UTC.
So if you like, you can use my tool called the ‘OptimizeSmart – UTC Time Converter’.
It is a Google Sheet tied to scripts that convert any time zone into UTC.
Note: This time zone converter is based on the scripts and instructions provided by David of https://davidkeen.com/blog/2017/01/time-zone-conversion-in-google-sheets/; I just made a few changes to it.
To use this time converter, follow the steps below:
Step-1: Click on the Google Sheet OptimizeSmart – UTC Time Converter
Step-2: Click on the ‘File’ menu and then click on ‘Make a Copy’:
Step-3: Find your time zone name from the TZ Database: https://en.wikipedia.org/wiki/List_of_tz_database_time_zones
For example, the TZ database time zone name for EST (Eastern Standard Time) is America/New_York
Similarly, the TZ database time zone name for PST (Pacific Standard Time) is America/Los_Angeles
Step-4: Delete the existing data under the two columns: “Your local date and time” and “Your TZ database time zone name“:
Note: Do not delete the data in the third column, ‘UTC Time’. This column contains the cells which contain the formula that converts your time zone into UTC.
Here is what that formula looks like:
Step-5: Add your own data under the two columns: “Your local date and time” and “Your TZ database time zone name“:
Step-6 (optional): Copy the formula by dragging down the fill handle (the plus sign that appears at the lower right corner of a cell):
Step-7: Copy the converted time zones from the ‘UTC Time’ column and paste them into the Google Sheets where you want to use them.
Alternatively, connect this sheet to your data source schema via the ‘Google Sheets’ connector.
How to report a user-specific time zone in Looker Studio using Google Analytics and Google Tag Manager
As you know, Google Analytics reports the user timing per the time zone set in the admin section. But it becomes a little trickier if you want to understand user experience for an international audience. However, this can be overcome by capturing user-specific time in Google Analytics. This process involves the following steps:
- Creating hit scope custom dimension
- Adding data source parameter
- Adding calculated fields
- Creating a dashboard
Now let’s see each of these steps in more detail.
Creating hit scope custom dimension
The very first step is to create a custom dimension in Google Analytics with a hit scope that will capture the user-specific time.
Follow the below steps to set create and set up this custom dimension
Step-1: Navigate to the admin section of Google Analytics, and under the ‘Property’ column, click on ‘Custom Dimension’.
Step-2: Create a new custom dimension with hit scope and name it ‘User-specific date and time’.
Step-3: You will get a screen like below. Note down the dimension index number, and click on ‘Done’.
Step-4: Now navigate to your Google Tag Manager account and click on ‘Variables’.
Step-5: Create a new user-defined variable of type’ Custom JavaScript’ and name it ‘User-specific date and time’.
Step-6: Now add the below lines of code to the variable and click on ‘Save’.
function(){ var currDate = new Date(); function pad(number) { if ( number < 10 ) {return ‘0’ + number;} return number; } return currDate.getFullYear() + “/” + pad(currDate.getMonth()+1) + “/” + pad(currDate.getDate()) + ” ” + pad(currDate.getHours()) + “:” + pad(currDate.getMinutes()) }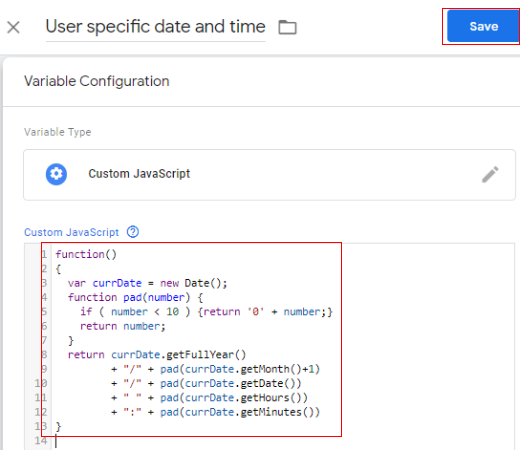
Step-7: Now open your Google Analytics settings variable and, under ‘More settings’, map the recently created variable to the custom dimension index.
Step-8: Preview the GTM container and check whether the dimension contains the user-specific time.
As you can see, the dimension contains the user-specific time and date information. Now you can publish the GTM container.
Now you need to wait a couple of days to generate the data. Then you can move on to the next step.
Adding data source parameter
Now let’s add a data source parameter to switch between application time (Google Analytics time zone) and user-specific time. This configuration is done in Looker Studio. If you are new to Looker Studio, you can read more about it here Looker Studio Tutorial with FREE PDF ebook.
Follow the below steps to add the required parameter.
Step-1: Navigate to Looker Studio, and under the ‘Resources’ menu, click on ‘Manage added data sources’.
Step-2: Click on ‘Edit’.
Step-3: Now click on ‘Add parameter’.
Step-4: Now give the parameter the name ‘Time repository’, then select the radio button ‘List of Values’ and add ‘Application Time’ and ‘User Specific Time’, like below.
Step-5: Now click on ‘Save’.
Adding calculated fields
In this step, we will create calculated fields in Looker Studio to map them with the ‘Time repository’ parameter. I will use ‘UST’ as a prefix for ‘User-specific time’ and ‘AST’ for ‘Application-specific time’.
Follow the below step to create the calculated fields.
Step-1: Click on ‘Add Field’.
Step-2: Add the field name as ‘UST- Date and Time’, and then in the formula, paste the below code:
“PARSE_DATETIME(‘%Y/%m/%d %H:%M’, User specific date and time)”
Here, the user-specific date and time is the exact name of the custom dimension we created in Google Analytics.
Now click on ‘Save’.
Step-3: Now create another field with the name ‘UST – Day of week’, and then in the formula, paste the below code:
REPLACE(FORMAT_DATETIME(‘%w-%A’, UST – Date and time),’0′,’7′)
Here UST – Date and time is the name of the first custom field we created.
Now save the field.
Step-4: Now create a third field with the name ‘AST – Day of week’, and then in the formula, paste the below code.
REPLACE(FORMAT_DATETIME(‘%w-%A’, Date),’0′,’7′)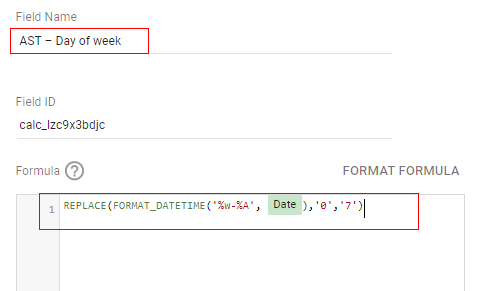
Save the field.
Step-4: Now create the fourth field with the name ‘UST – Hour’, and then in the formula, paste the below code
CAST (FORMAT_DATETIME(‘%H’, UST – Date and time) AS NUMBER)
Here UST – Date and time is the name of the first custom field we created.
Now save the field.
Step-5: Now, lets we need to create a wrapper inside a calculated dimension so that we can use the parameters. This is done by adding our next field as below.
“UST – Time repository – dim wrp”
- Time repository
Step-6: Now, let’s create the sixth calculated field and name it ‘UST – Selected day of week’ and paste the following code in the formula box.
CASE WHEN UST Time repository dim wrp = ‘User Specific Time’ THEN UST – Day of weekWHEN UST Time repository dim wrp = ‘Application Time’ THEN AST – Day of weekend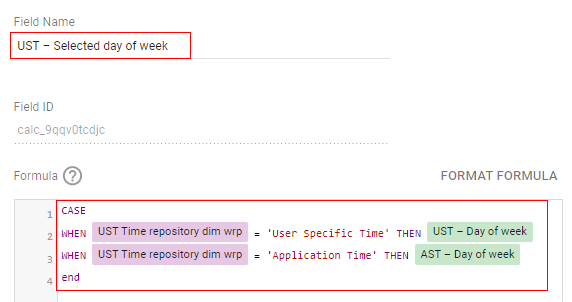
Step-7: We need to add our last field as ‘UST – Selected hour’ and paste the following code into the formula box.
CASEWHEN ust_time_repository_dim_wrp = ‘User Specific Time’ THEN UST – HourWHEN ust_time_repository_dim_wrp = ‘Application Time’ THEN Hourend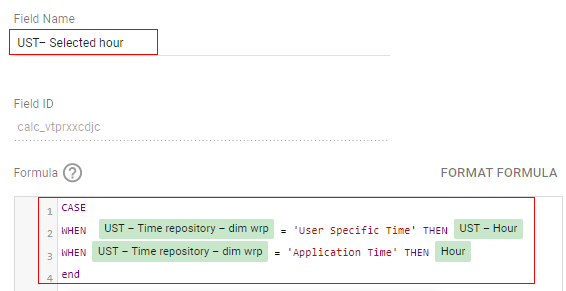
We are done with the data source configuration now.
Creating a dashboard
Now let’s create a dashboard with the below steps.
Step-1: Click on ‘Add a control’ and select ‘Drop-down list’.
Step-2: Select ‘Time repository’ as the control field.
Step-3: Add another drop-down list and select the control field as ‘continents’.
Step-4: Now insert a ‘Time series’ chart and use ‘UST – Selected hour’ as the dimension, then select any metric such as pageviews.
Step-5: Now add another chart as ‘Pivot’ and use ‘UST – Selected hour’ as the row dimension and ‘UST – Selected day of the week’ as the column dimension, then add your metric.
For all the above steps, you can customize your style based on requirements.
Step-6: Now, let’s view the report, which will look like the one below.
Congratulations, you have successfully reported a user-specific time zone in Looker Studio using Google Analytics and Google Tag Manager.
Now you can select the user-specific time or application time (Google Analytics time zone setting) from the ‘Time Repository’ drop-down.
You can also select the different continents from the “Continent” drop-down.
Other Articles on Google Sheets
- How to use Looker Studio with Google Sheets
- How to extract data from Excel or CSV file into Google Sheets
- How to extract data from Google Ads to Google Sheets
- How to use Supermetrics for Google Sheets Add-on
- Connect and transfer data from Google Sheets to BigQuery
- Sending data from Google Search Console to Google Sheets
- Supermetrics Queries for Google Sheets – Tutorial
- How to extract data from Google Analytics into Google Sheets
- Looker Studio Date Format for Google Sheets – Tutorial
- Learn to export Facebook ads data to Google Sheets
- Understanding Aggregation in Google Sheets


